
The Wrap and Tuck Banding Method
The most popular band attachment method is the “Wrap and Tuck.” It’s been around for ages, works for modern forks as well as naturals, and requires just a strip of rubber and no tools (or a tool as simple as the lanyard on your slingshot.)
For the photos, we’re using the Scout and the included lanyard as the loop. You can also use a piece of ribbon, wire, any sturdy pulling device, foreceps or just your thumb. You may also use office rubber bands for tie-in material.
OK. Let’s get started! Seven steps to completing the Wrap and Tuck band attachment method.
1. Lay down one wrap of tie material on target side of slingshot.
This creates a strong “grippy” base for the band. The wrap and tuck relies on this friction, so take advantage of it with this step.
2. Place the band over the back of the slingshot (target side) and begin wrapping.
Don’t pull so tight that it’s impossible to hold, but make sure it’s snug enough to be sure the band won’t wiggle loose.
3. Apply at least three wraps, stretching the tie in material as you wrap.
Again, stretch it tight, but don’t over or under-do it. You should be able to get 3 or more full wraps.

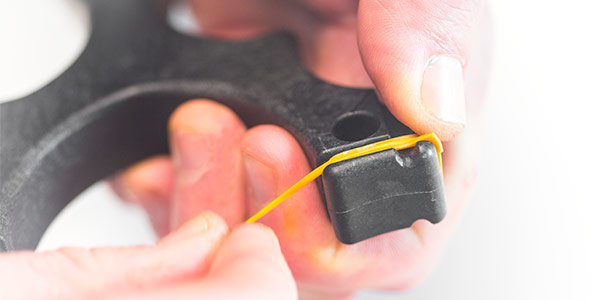
4. After at least three tensioned wraps, place a loop on the target side of the band grooves.
This could be your lanyard (shown) or any loop of wire (not too thin / sharp though), ribbon, or even your thumb.

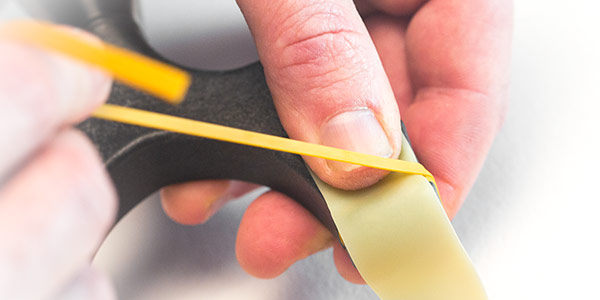
5. Make TWO more tensioned wraps.
These wraps lock in the end, so don’t skimp here. Keep them tight and aligned well to hold the band securely.

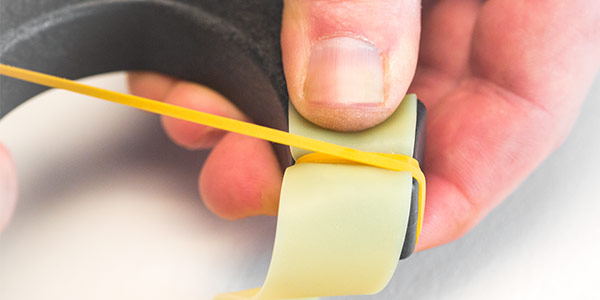
6. Carefully holding the tensioned wraps in place, feed the tag end through the loop.
Don’t lose your grip or all that work can vanish in an instant. (We’ve all had it happen. Don’t worry if it does; just try again!)

7. Pull the loop back underneath the final two wraps.
If you’re using your thumb, roll your thumb out, pulling the end with it. Tricky at first. with practice, it’s all muscle memory. Easy!

That’s it! The finished product.
Pull the end all the way through, or leave a loop as shown for easy removal.
It’s an old video, but it does the trick. Here you can watch the process of the Wrap and Tuck method for slingshot banding happen on video. Keep practicing if you find it difficult. It won’t always be so tough!
If you’d rather skip this method altogether, consider the Ocularis™ or FlipClip™ banding systems. Both accommodate various bands (flats or tubes) and thicknesses. Check out these three slingshots for each band attachment method.
Slingshot Bands

Slingshot DIY

Slingshot Ammo

More topics you might like:

Ask SimpleShot with Mike Petrouski
Learn about slingshots in our latest Ask SimpleShot episode!The Essence of Modern Slingshot...

Ask SimpleShot with Graydon and Will
Learn about slingshots in our latest Ask SimpleShot episode!Father-Son Duo Share Their Slingshot...

Ask SimpleShot with Mike Gideon
Learn about slingshots in our latest Ask SimpleShot episode!Hocking Hill Slingshot Tournament: An...
Thanks, great article.
Glad you liked it!
Ahhh this vid clarified it very much. TNX.
You’re welcome! Thanks for your support!
No…Have not found enough feel good time to build as I battle through the days . I have watched your videos and they cleared things up on fastening bands to the stock. I only got one of the black bands to tie with. Was not sure if I was to cut in half or get another band to tie with. I am a 64 year old kid. I made a lot of these as a kid. I never had any good rubber but I kept trying. I have two grandsons, 8 and 9, to build with. They live in Houston but get to our Okla ranch 2-3 times a year.. Before I came across your web site I had been gathering some of the BLUE bands they use to pull your blood. I had not built one up as unsure of the pocket and the tie off rubbers. Hope to get mine made up shortly. Live in the country so a lot of good trees to build with and places to shoot.
Ron, give that one tie-in band a little stretch and the two strips (cut at the same time, so they look like one) will pop apart. They stick right together and look like one, but most likely, it’s two stuck together.
If you find that you really did get one, just contact us and we’ll make it right!
https://simple-shot.com/contact
I would like to see how you are attaching the bands to the pouch. This video bypassed that operation.
Are their a number a person can call in orders, i dont have a computer or webb site
We don’t take phone orders, no. I’m sorry about that.
Out of curiosity, how did you leave this comment? Whatever device you used is capable of ordering!
The first time I was able to shoot my oculous slingshot that I purchased I December 2019 was December 27th. The plug came out of one of the forks and I wasn’t able to recover it. How can I get a replacement.
We sell them here https://youtu.be/Tu31jxIUVZs
You always show the wrap and tuck for OTT. I want to see it for TTF. Are the bands placed to the out side of the forks?
How do you attach bands to a natural fork for TTF configuration?
That one’s a bit tricky. You need to make your frame with a tie in on the sides then you’d tie it in the same way.
Glad to see your tuck on the tag end. I have just ordered the ocularis so it’s not necessary, but ya just never know when things happen and ya need to go back to basics. Thanks for taking this fun sport seriously. Looking forward to years of enjoyment with this great group.